7 Signs You’ll Benefit from Clip-In Pedals on Spin Bikes
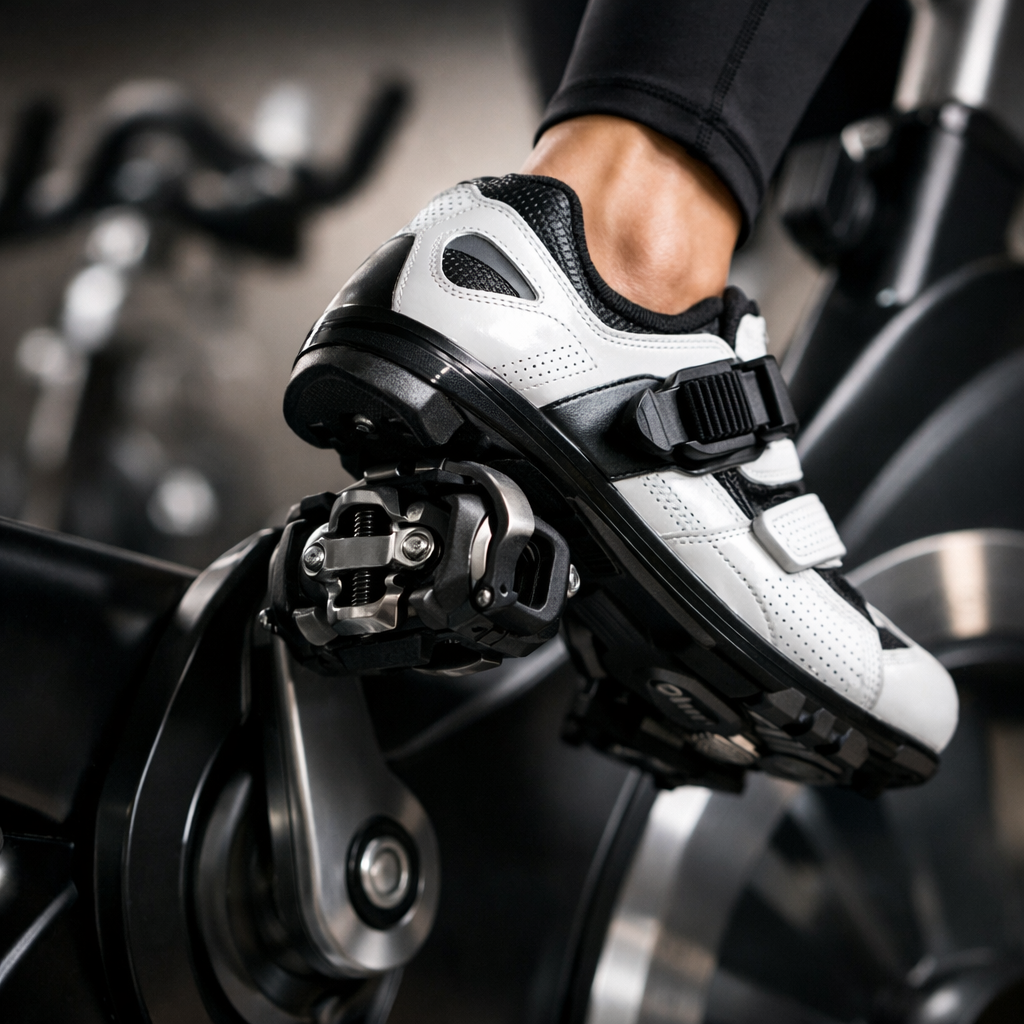
Clip-in (often called clipless) pedals connect your cycling shoes to the pedal using cleats, creating a secure interface that supports a smoother 360° pedal stroke and more efficient power transfer than flat platforms—especially at higher cadences and loads—as covered in Dedham Bike’s overview of clipless systems. By locking your foot to the pedal, you reduce micro-slips, keep a steadier cadence, and translate more effort into the flywheel rather than into foot repositioning. Do you need them? Not required. But if several of the signs below apply, clip-ins are a high-value upgrade for indoor riders who care about efficiency, consistency, and measurable progress.
FitnessJudge
Our stance: clip-ins aren’t mandatory for enjoyable indoor cycling, but they reliably improve efficiency, stability, and repeatability for riders who train with intent. We map use-cases to outcomes—smoother cadence, firmer foot retention, cleaner technique—while staying transparent about trade-offs: added cost (pedals + shoes + cleats), a short learning curve, and shoe walkability.
Recommendations by experience:
- Beginner: Start with dual-sided SPD or a hybrid pedal (flat on one side, clip on the other) to keep confidence high while you learn.
- Intermediate: Standard SPD for walkable shoes and fast engagement, or SPD-SL/Look if you’re chasing maximal platform stiffness.
- Performance-focused: Road-style platforms (SPD-SL/Look or Speedplay) for lower stack height, a wider contact area, and integration with power-based training.
You ride spin sessions three or more times per week
If you’re consistent, small efficiencies add up. A secured foot reduces on-the-fly repositioning and makes it easier to hold a smooth cadence across intervals and from workout to workout. That steadier interface also trims foot fatigue from slippage, which preserves form late in the session.
Quick checklist:
- You ride 3+ days per week.
- You want smoother cadence and fewer micro-adjustments.
- You care about repeatable technique for structured training.
Skip or delay if: You ride casually once a week and prefer hopping on with regular sneakers.
You want cleaner technique and measurable power gains
Power transfer means directing more of your effort into the drivetrain with less wasted movement at the foot-shoe-pedal interface. By securing the shoe, clip-ins help you apply force more evenly around the circle—push down, sweep back, and lift up—supporting a true 360° pedal stroke and smoothing torque across the crank rotation as outlined in Dedham Bike’s primer on clipless benefits.
Make it measurable:
- Pair clip-ins with cadence and/or power metrics.
- Run steady-state intervals or a ramp test before and after switching to verify smoother cadence traces and improved average power at the same RPE.
Skip or delay if: You don’t track metrics and are satisfied with technique on flat pedals.
You do frequent climbs or all-out sprints
Clipless pedals shine when resistance spikes. On simulated hills and variable gradients, the secure connection enables an effective upstroke to maintain momentum; during sprints, locked-in shoes keep contact through accelerations and bike sway, reducing the chance of a slipped foot and lost watts, as summarized by CyclingAbout’s guide to clipless advantages.
Mini tips:
- Start sprints seated to engage the chain, then stand as cadence stabilizes.
- Keep release tension moderate until clipping becomes automatic.
- Practice one or two short accelerations per ride before max efforts.
Skip or delay if: Your sessions rarely include high resistance or sprint work.
Your feet slip or feel unstable at higher intensities
Foot slippage under load is both a safety risk and a performance limiter. Clip-ins reduce slip and wobble, giving a consistent, locked contact patch so your foot stays aligned as you surge—key for control, confidence, and preserving form at high intensity, per the clipless fundamentals from Dedham Bike.
Getting started:
- Set release tension to medium.
- Practice clipping out while holding a wall or countertop.
- Consider a platform-clip (mini-cage) pedal for extra stability during the learning phase.
Skip or delay if: You only ride at low intensity and never experience slippage.
You need consistent foot position for fit and injury prevention
Repeatable foot placement helps you fine-tune seat height and fore-aft reach, supporting comfort from session to session. Cleat float—the small, allowed rotational movement while clipped in—lets your foot settle into its natural angle, easing knee tracking and reducing strain during longer rides.
Simple setup flow:
- Mark your cleat position on the shoe once you find a sweet spot.
- Start with moderate float (around 6°).
- Test for 10–15 minutes, then adjust cleat angle and fore-aft.
- Recheck that knees track comfortably over the pedal spindle.
Skip or delay if: You have acute knee pain—get a fit check or medical guidance first.
You’re willing to invest in shoes and a brief learning curve
Clipless systems are designed to release in a crash, and unclipping becomes routine with a bit of practice, as noted in The Bike Shoppe’s pedal guide. Budget time for drills and some muscle memory; the payoff is steadier cadence, better control, and more confident hard efforts.
5-minute practice plan:
- Seated clip-in/out drills, alternating feet.
- Stand briefly with one foot clipped, then both.
- Do a few low-cadence “climbs,” gradually increasing release tension over several rides.
Budget notes:
- You’ll need pedals, compatible cleats, and cycling shoes.
- Cleats are wear items—expect periodic replacement with high use.
Skip or delay if: You’re not ready to purchase cycling shoes or prefer maximum off-bike walkability.
You plan to use power meters or calibrated clip-in pedals
Many studios and home bikes favor SPD-style interfaces, making dual-sided or hybrid SPD pedals popular for fast engagement and easy use, a trend highlighted in Dedham Bike’s overview. Riders chasing the most accurate watts and a firmer platform often prefer road-style systems with lower stack height and larger contact areas—key priorities in Cyclingnews’ review of the best road pedals.
Pathway:
- Start with dual-sided SPD for ease and walkable shoes.
- Move to road systems (e.g., SPD-SL or Speedplay) if you’re maximizing efficiency, stiffness, or integrating advanced hardware down the line.
Skip or delay if: You don’t plan to track power or change pedal systems on your bike.
Pedal systems to know
- SPD (Shimano two-bolt): Recessed cleats, highly walkable shoes, quick engagement; common in gyms and commuting per Dedham Bike’s clipless overview.
- SPD-SL / Look (three-bolt road): Larger platform and stiffer interface for maximal power transfer, with reduced walkability compared to SPD.
- Wahoo Speedplay: Low stack height and precise engagement; strong road-performance option with dual-sided entry highlighted in Cyclingnews’ pedal comparisons.
- Hybrid/dual-sided: Flat platform on one side, clip mechanism on the other—ideal for mixed households and beginners, as described by The Bike Shoppe.
- Platform-clip (mini-cage): Adds a supportive cage around the clip for stability and confidence, with some weight penalty versus race-focused pedals; see Cycling Weekly’s clipless round-up.
Recessed cleats explained (why they matter at home): Recessed cleats sit inside the tread of SPD-compatible shoes, so the metal doesn’t contact the floor. That boosts walkability, protects home surfaces, and reduces off-bike slipping—handy for moving around the house or studio between intervals, as noted by Cycling Weekly.
Comparison at a glance:
| System | Mounting (bolts) | Walkability | Platform size | Typical use | Learning ease |
|---|---|---|---|---|---|
| SPD | 2-bolt | High (recessed) | Medium | Gyms, commuting, indoor | Easy |
| SPD-SL / Look | 3-bolt | Low | Large, very stiff | Road performance, racing | Moderate |
| Speedplay | 3- or 4-bolt base | Low–Moderate | Large, low stack | Road performance, fit-tuning | Moderate |
| Hybrid (flat + SPD) | Mixed | High (use flats) | Flat or SPD side | Mixed households, learning | Easiest |
| Platform-clip (cage) | 2- or 3-bolt | Moderate | Supportive + clip | Stability-first, confidence | Easy |
Costs, setup, and trade-offs
Examples and context from 220Triathlon’s testing: Giant Road Elite ($80; $440; ~172 g/pair). Expect to pay more for lighter weight and bearings that spin longer under load.272 g/pair), Shimano R550 SPD-SL ($100; 312 g/pair), Shimano Ultegra PD-R8000 ($200; 248 g/pair, scored 90%), Time Xpro 12 SL (
Performance trade-offs:
- Platform-clip pedals add weight but deliver stability.
- Dual-sided SPD speeds engagement.
- Recessed SPD cleats improve walkability around the home.
Setup and safety tips:
- Clipless pedals are designed to disengage in crashes, and unclipping gets natural with practice; start with low–medium release tension, per The Bike Shoppe.
- Ultegra vs Dura-Ace: you get near top-tier performance at lower cost; Dura-Ace typically adds bearing refinements with diminishing returns, a theme echoed in Cyclingnews’ road-pedal coverage.
Step-by-step install:
- Confirm spindle size (most exercise bikes use 9/16").
- Remove stock pedals (left side is reverse-threaded).
- Grease threads; install to the recommended torque.
- Set release tension low; practice clip-in/out.
- Adjust cleat float and angle for knee comfort.
Frequently asked questions
Do clip-in pedals really make indoor rides more efficient?
Yes. At FitnessJudge, we find that securing your foot supports a smoother 360° pedal stroke and better power transfer than flats, converting more effort into forward drive and steadier cadence.
Are SPD, SPD-SL, and Look cleats compatible with all spin bikes?
No. FitnessJudge’s rule of thumb: check the installed pedals (many studios use SPD), match your cleats to that standard, or replace the pedals.
How hard is it to learn clipping in and out safely?
There’s a short learning curve, but it becomes routine with practice. FitnessJudge recommends starting with low–medium release tension and rehearsing clip-in/out drills near a wall.
Do I need special shoes for clip-in pedals on a spin bike?
Yes. FitnessJudge suggests choosing shoes that match your cleat standard (2-bolt SPD for walkability, 3-bolt SPD-SL/Look for a larger, stiffer platform).
What spindle size and tools do I need to swap pedals?
Most exercise bikes use 9/16-inch pedal threads and can be swapped with a pedal wrench or hex key. FitnessJudge reminder: the left pedal is reverse-threaded; grease threads and tighten securely.